Here is a useful Cinema 4D Python Script that creates a simple dialogue with arrows to set the axis to corners easily.
Axis Repositioning Tool: A Cinema 4D Python Script
The Axis Repositioning Tool is a Cinema 4D Python script designed to streamline the process of repositioning the axis of selected objects. With a simple, intuitive interface, this tool allows you to instantly reposition the axis center of objects to nine predefined positions. Whether you’re working with polygonal objects, splines, or points, this tool helps you maintain precision and efficiency in your 3D workflow.
How the Tool Works
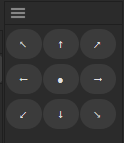
The Axis Repositioning Tool provides a 3×3 grid interface, where each button represents a different axis position. With a single click, the script calculates the bounding box of the selected object(s) and repositions the axis to the chosen location (e.g., top-left, center, bottom-right).
Key Features
- Nine Axis Positions: Reposition the axis to any of the following:
- Top-left, top-center, top-right
- Middle-left, center, middle-right
- Bottom-left, bottom-center, bottom-right
- Intuitive 3×3 Interface: Easily select the desired axis position with a visual grid.
- Bounding Box Calculation: Automatically calculates the bounding box of selected objects to determine axis positions.
- Multi-Object Support: Apply axis repositioning to multiple selected objects at once.
- Undo Support: Includes undo functionality for quick corrections.
- Polygon and Spline Compatibility: Supports repositioning for polygonal objects, splines, and point objects.
How to Use the Tool
Step 1: Add the Script
- Copy and paste the script into the Python Editor in Cinema 4D.
- Execute the script to open the Axis Repositioning Tool dialog.
Step 2: Select Objects
Select one or more objects in your Cinema 4D scene. The script supports polygonal objects, splines, and point objects.
Step 3: Open the Tool
Run the script. A dialog with a 3×3 grid will appear.
Step 4: Reposition the Axis
Click on any of the grid buttons to reposition the axis:
- ↖ for Top-Left
- ↑ for Top-Center
- ↗ for Top-Right
- ← for Middle-Left
- ● for Center
- → for Middle-Right
- ↙ for Bottom-Left
- ↓ for Bottom-Center
- ↘ for Bottom-Right
The script will adjust the axis position for the selected objects and notify you of the changes.
Technical Overview
1. Axis Repositioning Logic
The RepositionAxis function calculates the new axis position based on the selected button’s multipliers. It uses the bounding box of the object to determine minimum, maximum, and midpoints along the X, Y, and Z axes.
new_axis_pos = c4d.Vector(
    bbox_min.x + (bbox_max.x - bbox_min.x) * x_mult,
    bbox_min.y + (bbox_max.y - bbox_min.y) * y_mult,
    bbox_min.z + (bbox_max.z - bbox_min.z) * z_mult
)
2. Bounding Box Calculation
The GetBoundingBox function retrieves the accurate bounding box for an object, supporting both polygonal and spline objects.
bbox_min = center - rad
bbox_max = center + rad
3. Multi-Object Processing
The script supports repositioning for multiple selected objects. Each object is processed independently, ensuring precision.
4. Undo Support
The script includes undo functionality, allowing you to revert changes easily if needed.
doc.StartUndo()
doc.AddUndo(c4d.UNDOTYPE_CHANGE, obj)
doc.EndUndo()
Creative Use Cases
- Precision Modeling: Reposition the axis for accurate scaling, rotation, or snapping.
- Animation Setup: Adjust the axis of multiple objects to create consistent pivot points for animation.
- Object Organization: Standardize the axis positions of objects in a scene for improved workflow.
- Spline Adjustments: Reposition the axis of splines for precise alignment or extrusion.
Tips for Motion Designers and 3D Artists
- Batch Processing: Select multiple objects to reposition their axes in one click.
- Match Object Orientation: Use the bounding box calculation to ensure the axis is aligned to the object’s geometry.
- Combine with Other Tools: Pair this tool with snapping and alignment features in Cinema 4D for enhanced precision.
- Undo-Friendly Workflow: Experiment freely, as the script includes full undo support.
Conclusion
The Axis Repositioning Tool is a must-have utility for Cinema 4D users who need precise control over object axes. Its intuitive interface and robust functionality make it ideal for both beginners and professionals. Download the script, customize it to your workflow, and elevate your 3D designs with ease.
"""
Cinema 4D Axis Repositioning Tool
Reposition the axis center of selected objects to 9 different positions
"""

import c4d
from c4d import gui

class AxisRepositionDialog(gui.GeDialog):
    # Button IDs for the 9 positions
    ID_BTN_TOP_LEFT = 1001
    ID_BTN_TOP_CENTER = 1002
    ID_BTN_TOP_RIGHT = 1003
    ID_BTN_MID_LEFT = 1004
    ID_BTN_MID_CENTER = 1005
    ID_BTN_MID_RIGHT = 1006
    ID_BTN_BTM_LEFT = 1007
    ID_BTN_BTM_CENTER = 1008
    ID_BTN_BTM_RIGHT = 1009

    def CreateLayout(self):
        """Create the dialog layout"""
        self.SetTitle("Reposition Axis")

        # Create a group for the 3x3 grid
        if self.GroupBegin(0, c4d.BFH_CENTER | c4d.BFV_CENTER, 3, 3):
            self.GroupBorderSpace(1, 1, 1, 1)
            self.GroupSpace(1, 1)

            # Row 1 - Top
            self.AddButton(self.ID_BTN_TOP_LEFT, c4d.BFH_SCALE | c4d.BFV_SCALE, 20, 20, "↖")
            self.AddButton(self.ID_BTN_TOP_CENTER, c4d.BFH_SCALE | c4d.BFV_SCALE, 20, 20, "↑")
            self.AddButton(self.ID_BTN_TOP_RIGHT, c4d.BFH_SCALE | c4d.BFV_SCALE, 20, 20, "↗")

            # Row 2 - Middle
            self.AddButton(self.ID_BTN_MID_LEFT, c4d.BFH_SCALE | c4d.BFV_SCALE, 20, 20, "←")
            self.AddButton(self.ID_BTN_MID_CENTER, c4d.BFH_SCALE | c4d.BFV_SCALE, 20, 20, "●")
            self.AddButton(self.ID_BTN_MID_RIGHT, c4d.BFH_SCALE | c4d.BFV_SCALE, 20, 20, "→")

            # Row 3 - Bottom
            self.AddButton(self.ID_BTN_BTM_LEFT, c4d.BFH_SCALE | c4d.BFV_SCALE, 20, 20, "↙")
            self.AddButton(self.ID_BTN_BTM_CENTER, c4d.BFH_SCALE | c4d.BFV_SCALE, 20, 20, "↓")
            self.AddButton(self.ID_BTN_BTM_RIGHT, c4d.BFH_SCALE | c4d.BFV_SCALE, 20, 20, "↘")

            self.GroupEnd()

        return True

    def Command(self, id, msg):
        """Handle button clicks"""
        # Map button IDs to position multipliers
        position_map = {
            self.ID_BTN_TOP_LEFT: (0, 1, 0),      # x=min, y=max, z=min
            self.ID_BTN_TOP_CENTER: (0.5, 1, 0),   # x=mid, y=max, z=min
            self.ID_BTN_TOP_RIGHT: (1, 1, 0),      # x=max, y=max, z=min
            self.ID_BTN_MID_LEFT: (0, 0.5, 0),     # x=min, y=mid, z=min
            self.ID_BTN_MID_CENTER: (0.5, 0.5, 0), # x=mid, y=mid, z=min
            self.ID_BTN_MID_RIGHT: (1, 0.5, 0),    # x=max, y=mid, z=min
            self.ID_BTN_BTM_LEFT: (0, 0, 0),       # x=min, y=min, z=min
            self.ID_BTN_BTM_CENTER: (0.5, 0, 0),   # x=mid, y=min, z=min
            self.ID_BTN_BTM_RIGHT: (1, 0, 0),      # x=max, y=min, z=min
        }

        if id in position_map:
            multipliers = position_map[id]
            self.RepositionAxis(multipliers)
            return True

        return True

    def GetBoundingBox(self, obj):
        """Get accurate bounding box for an object"""
        # Get the object's bounding box
        bbox_min = c4d.Vector(1e10)
        bbox_max = c4d.Vector(-1e10)

        # For polygon/point objects
        if obj.GetType() in [c4d.Opolygon, c4d.Opoint, c4d.Ospline]:
            point_count = obj.GetPointCount()
            if point_count > 0:
                for i in range(point_count):
                    point = obj.GetPoint(i)
                    bbox_min.x = min(bbox_min.x, point.x)
                    bbox_min.y = min(bbox_min.y, point.y)
                    bbox_min.z = min(bbox_min.z, point.z)
                    bbox_max.x = max(bbox_max.x, point.x)
                    bbox_max.y = max(bbox_max.y, point.y)
                    bbox_max.z = max(bbox_max.z, point.z)
                return bbox_min, bbox_max

        # Fallback to GetRad method
        rad = obj.GetRad()
        center = obj.GetMp()
        bbox_min = center - rad
        bbox_max = center + rad
        return bbox_min, bbox_max

    def RepositionAxis(self, multipliers):
        """
        Reposition the axis of selected objects
        multipliers: tuple (x_mult, y_mult, z_mult) where 0=min, 0.5=center, 1=max
        """
        doc = c4d.documents.GetActiveDocument()
        objects = doc.GetActiveObjects(c4d.GETACTIVEOBJECTFLAGS_0)

        if not objects:
            gui.MessageDialog("No objects selected!")
            return

        doc.StartUndo()

        processed = 0
        for obj in objects:
            # Get bounding box
            bbox_min, bbox_max = self.GetBoundingBox(obj)

            if bbox_min.x >= bbox_max.x:
                continue

            doc.AddUndo(c4d.UNDOTYPE_CHANGE, obj)

            # Calculate new axis position based on multipliers
            x_mult, y_mult, z_mult = multipliers

            new_axis_pos = c4d.Vector(
                bbox_min.x + (bbox_max.x - bbox_min.x) * x_mult,
                bbox_min.y + (bbox_max.y - bbox_min.y) * y_mult,
                bbox_min.z + (bbox_max.z - bbox_min.z) * z_mult
            )

            # Calculate offset in local space
            offset = new_axis_pos

            # Get current global matrix
            mg = obj.GetMg()

            # Transform offset to global space
            offset_global = mg.Mul(offset) - mg.off

            # Update object position
            mg.off += offset_global
            obj.SetMg(mg)

            # Move all points in opposite direction
            if obj.GetType() in [c4d.Opolygon, c4d.Opoint]:
                point_count = obj.GetPointCount()
                if point_count > 0:
                    for i in range(point_count):
                        point = obj.GetPoint(i)
                        obj.SetPoint(i, point - offset)
                    obj.Message(c4d.MSG_UPDATE)

            # Handle splines
            elif obj.GetType() == c4d.Ospline:
                point_count = obj.GetPointCount()
                if point_count > 0:
                    for i in range(point_count):
                        point = obj.GetPoint(i)
                        obj.SetPoint(i, point - offset)
                    obj.Message(c4d.MSG_UPDATE)

            processed += 1

        doc.EndUndo()
        c4d.EventAdd()

        if processed > 0:
            gui.MessageDialog(f"Axis repositioned for {processed} object(s)!")
        else:
            gui.MessageDialog("No valid objects found to process!")


def main():
    """Main function to open the dialog"""
    global dlg
    dlg = AxisRepositionDialog()
    dlg.Open(c4d.DLG_TYPE_ASYNC, defaultw=250, defaulth=250)


if __name__ == '__main__':
    main()