For Cinema 4D 2026 & Redshift
If you have ever tried to layer a “Scratches” normal map on top of a “Wood Grain” normal map in Redshift, you’ve likely noticed something annoying: The details get washed out.
When you use a standard RS Color Mix or even the RS Bump Blender to mix two blue-purple normal maps, Redshift often treats them as simple pictures. It averages the pixels, which mathematically flattens the steepness of your details.
Today, we are addressing this issue with a custom OSL Shader that utilizes Reoriented Normal Mapping (RNM).
The Problem: “Averaging” vs. “Rotating”
Imagine a steep hill (your Base Normal). Now, imagine you want to plant a tree (your Detail Normal) on that hill.
- Standard Mixing: Redshift takes the average. It flattens the hill to make room for the tree. The result looks weak.
- Reoriented Mapping (This Shader): It calculates the slope of the hill and rotates the tree so it grows perpendicular to that slope. You keep the full depth of the hill and the full detail of the tree.
The Solution: The “RNM” Blender
We have adapted the famous “Stephen Hill / Colin Barré-Brisebois” blending method into a Redshift-compatible OSL shader.
Step 1: Get the Code
Copy the code below and save it as a text file named Normal_Blend_RNM.osl, or simply keep it ready to paste into C4D.
// Normal_Blend_RNM.osl
// Mathematically correct blending of two Tangent Space Normal Maps
// Logic based on Stephen Hill / Colin Barré-Brisebois RNM method

shader Normal_Blend_RNM
[[ string label = "Normal Map Blender (RNM)",
   string help = "Combines two normal maps by reorienting the detail layer to the base slope.",
   string category = "Math" ]]
(
    color BaseNormal = color(0.5, 0.5, 1.0) [[ string label = "Base Normal Map" ]],
    color DetailNormal = color(0.5, 0.5, 1.0) [[ string label = "Detail/Overlay Normal" ]],
    float strength = 1.0 [[ string label = "Detail Strength", float min=0.0, float max=1.0 ]],
    output color outNormal = color(0.5, 0.5, 1.0)
)
{
    // 1. Unpack [0,1] colors to [-1,1] vectors manually
    // We access components by index [0],[1],[2] to avoid OSL swizzling errors
    vector nBase = vector(BaseNormal[0], BaseNormal[1], BaseNormal[2]);
    vector nDetail = vector(DetailNormal[0], DetailNormal[1], DetailNormal[2]);

    // Remap 0..1 to -1..1
    nBase = (nBase * 2.0) - vector(1.0);
    nDetail = (nDetail * 2.0) - vector(1.0);

    // Apply strength to detail layer (lerp towards flat Z-up vector)
    nDetail = mix(vector(0.0, 0.0, 1.0), nDetail, strength);

    // Re-normalize vectors to clean up compression artifacts
    nBase = normalize(nBase);
    nDetail = normalize(nDetail);

    // 2. Reoriented Normal Mapping Logic
    // This maintains the "slope" of the detail map over the "slope" of the base map.

    // t.z += 1.0
    nBase = nBase + vector(0.0, 0.0, 1.0);

    // u.xy = -u.xy (Flip X and Y of detail)
    vector nDetailFlip = vector(-nDetail[0], -nDetail[1], nDetail[2]);

    // Calculate dot product
    float d = dot(nBase, nDetailFlip);

    // r = t * dot - u * t.z
    vector r = (nBase * d) - (nDetailFlip * nBase[2]);

    vector final = normalize(r);

    // 3. Pack back to [0,1] color for Redshift to read
    outNormal = color((final[0] * 0.5) + 0.5,
                      (final[1] * 0.5) + 0.5,
                      (final[2] * 0.5) + 0.5);
}Step 2: How to Use in Cinema 4D
Setting this up in the Redshift Node Editor takes about 30 seconds.
- Create the OSL Node:
- Open your Redshift Material in the Node Editor.
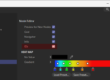
- Search for OSL Shader.
- Select the node, go to the Text tab in the Attribute Manager, and paste the code above.
- Click Compile.
- Load Your Maps:
- Bring in two RS Texture nodes (one for your Base surface, one for your Detail/Scratches).
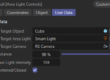
- Important: Ensure your normal map textures are set to Color Space: Raw (or Linear). If you leave them on sRGB, the math will be wrong.
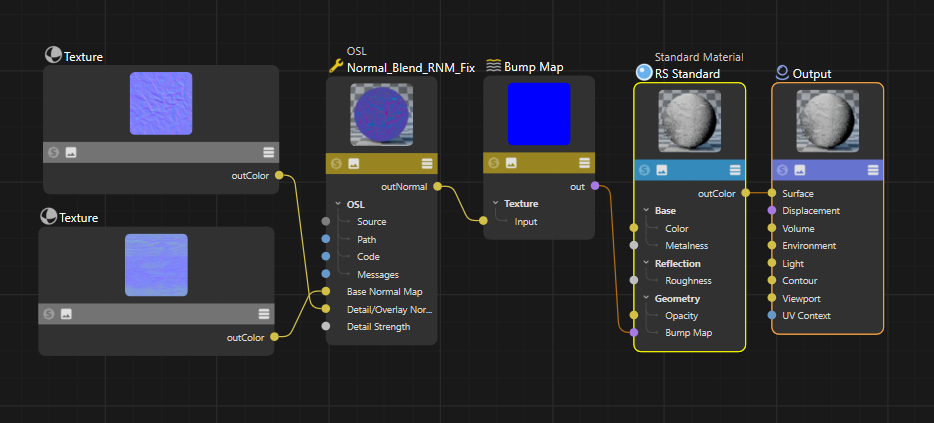
- Connect the Nodes:
- Connect Texture A
→→Base Normal Map. - Connect Texture B
→→Detail/Overlay Normal. - Connect the OSL Output (outNormal)
→→RS Bump Map node (Input: Texture Input).
- Connect Texture A
- Finalize:
- Set the RS Bump Map node to “Tangent Space Normal”.
- Connect the Bump Map node to your Material’s “Overall Bump Input”.
FAQ: Why not use the RS Bump Blender?
Redshift actually comes with a native Bump Blender node. So why bother with code?
| Feature | RS Bump Blender | This OSL Shader |
| Best For | Mixing Greyscale Height Maps | Mixing Tangent Normal Maps (Blue/Purple) |
| Math | Linear Layering / Additive | Vector Reorientation |
| Visual Result | Can flatten details when mixing normals | Preserves steep angles and contrast |
The Rule of Thumb:
- If you are mixing Height/Displacement maps (Black & White), use the native RS Bump Blender.
- If you are mixing Normal Maps (RGB), use this OSL Shader.
Happy Rendering! If you found this useful, save this OSL code to your library for future projects.