If you’ve ever tried to animate a large group of objects in Cinema 4D—clones, shapes, mograph elements—you’ve probably run into the same problem: everything moves the same way, at the same time, unless you break your workflow with extra effectors, delay setups, or messy keyframes.
This Python Field solves that.
The Fading Random Time Offset script is designed for motion designers who want the control of custom timing without the chaos of manual animation. It lets you create natural randomness, variable speeds, offset animations, custom ranges, and even curve-driven fades—all inside a Field. No Expression tags. No extra rigs. No clutter.
Let’s break down what it actually gives you.
Why This Field Exists
In real-world motion design, randomness is rarely actually random. It’s shaped, bounded, and often follows a larger timing structure. You want variation, but you also want direction.
Typical fields can randomize strength, but not time.
This Python Field introduces advanced temporal control:
- Each object gets a unique delayed start
- Each object moves with a unique speed
- All objects follow the same animation curve
- The system still respects a global start and end window
It’s procedural timing without the headache.
Key Features Motion Designers Will Love
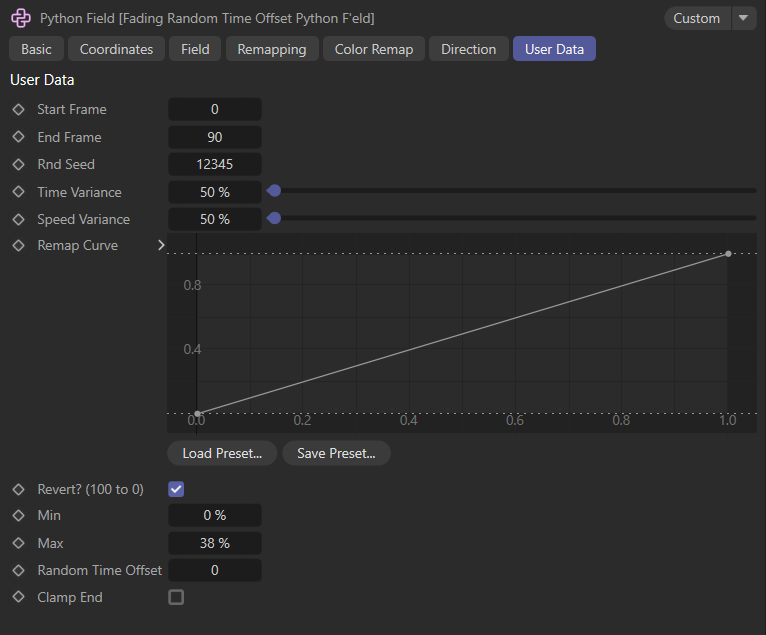
1. Individual Random Time Offsets
You can now spread animations intelligently across a time range.
Objects don’t start simultaneously—they each get their own offset, based on seed-driven stable noise.
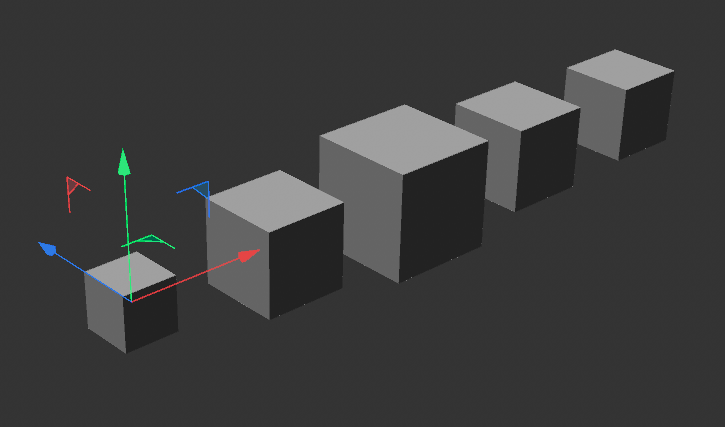
This gives you the organic staggered motion that makes mograph animations feel alive.
2. Optional Frame-Based Offset
Instead of only using percentage-based time variance, you can add frame-precise offsets.
This means:
- Want ±10 frames of randomness? Done.
- Need certain objects to begin early or late? Easy.
- Prefer animator-style frame randomness over math-based offsets? You’ve got it.
3. Speed Variance With Two Modes
You decide how duration behaves.
Clamped Mode (Bounded)
Animation must finish before the global end time.
Faster objects finish earlier, but slow ones never spill outside your timeline.
Perfect for broadcast schedules, tight edits, or timeline-sync work.
Unclamped Mode (Free)
Duration stretches or shrinks freely.
Slow elements may extend past the end. Fast ones snap early.
This mode feels more natural—great for particles, UI bursts, or morph-like sequences.
4. Curve-Based Shaping for Smooth Motion
Your animation’s easing isn’t locked to a formula.
You can use a user spline to shape the progression curve.
Want it to fade in softly?
Hit hard at the end?
Bounce? Ease? Overshoot?
The curve drives the animation.
5. Min–Max Range Mapping
This controls your output value range:
- 0–100% sliders
- Material parameters
- Strength values
- Blend shapes
- Deformers
You choose the minimum and maximum, and the system handles the interpolation.
6. Direction Reversal (Auto Revert)
Want some animations to “open” while others “close”?
Just flip the direction with a single checkbox.
This is a simple option but dramatically expands creative variation.
How It Fits Into a Motion Designer Workflow
This script is perfect when you want:
- A group of elements to animate in order, but not uniformly
- Organically staggered transitions
- Procedural motion that still follows a master timeline
- Time-based randomness without the mess
- A reusable setup for client projects or templates
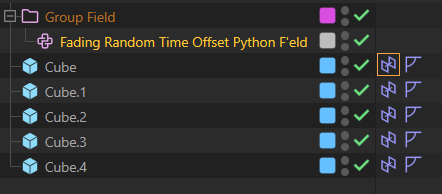
And because it’s all inside a Python Field, it plays well with:
- Mograph Effectors
- Fields
- Vertex maps
- Field layers
- Falloffs
- Material fields
- Custom rigs
- Animation systems

You can scale this from a handful of objects to thousands.
Why This Script Matters
Most timing systems in Cinema 4D rely on:
- Delay Effectors
- Random Effector tricks
- Step Effector hacks
- Manual keyframing
- Time offsets per clone
Those all work, but they’re messy, limited, or not procedural.
This script gives you:
- Clean procedural control
- Perfect repeatability through seeding
- High-level customization
- Artist-friendly behavior
- Production-speed iteration
It’s the kind of tool you’d expect in Houdini or a custom pipeline—now available inside a simple Field.
Conclusion
The Fading Random Time Offset Python Field is a must-have tool for motion designers who want smarter, more organic temporal control. Whether you’re animating UI elements, fragments, clones, characters, or abstract shapes, this setup gives you full creative authority over how your animation unfolds in time.
Once you use it in a few projects, it becomes one of those utilities you reach for again and again.
# --- Fading Random Time Offset Python Field' ---

import c4d
import math

# --- USER DATA ID MAPPING ---
ID_START_FRAME = 1     # Integer
ID_END_FRAME   = 2     # Integer
ID_SEED        = 3     # Integer
ID_TIME_VAR    = 4     # Float (Percent)
ID_SPEED_VAR   = 5     # Float (Percent)
ID_CURVE       = 6     # Spline
ID_REVERT      = 7     # Boolean
ID_MIN_VAL     = 8     # Float (Percent)
ID_MAX_VAL     = 9     # Float (Percent)
ID_RND_OFFSET  = 10    # Integer (Frames) - NEW
ID_CLAMP_END   = 11    # Boolean - NEW

def map_range(value, input_min, input_max, output_min, output_max):
    return output_min + ((value - input_min) / (input_max - input_min)) * (output_max - output_min)

def Sample(op, inputs, outputs, info):
    """
    Advanced Python Field 2.0
    Features:
    - Bounded or Free Speed Variance (Clamp End)
    - Random Frame Offsets (Integer)
    - Auto-Revert Direction
    - Min/Max Clamping
    """

    # 1. Retrieve User Data
    start_f   = op[c4d.ID_USERDATA, ID_START_FRAME]
    end_f     = op[c4d.ID_USERDATA, ID_END_FRAME]
    seed      = op[c4d.ID_USERDATA, ID_SEED]
    var_t     = op[c4d.ID_USERDATA, ID_TIME_VAR]
    var_s     = op[c4d.ID_USERDATA, ID_SPEED_VAR]
    curve     = op[c4d.ID_USERDATA, ID_CURVE]
    revert    = op[c4d.ID_USERDATA, ID_REVERT]
    val_min   = op[c4d.ID_USERDATA, ID_MIN_VAL]
    val_max   = op[c4d.ID_USERDATA, ID_MAX_VAL]
    rnd_frame = op[c4d.ID_USERDATA, ID_RND_OFFSET] # New Frame Offset
    clamp_end = op[c4d.ID_USERDATA, ID_CLAMP_END]  # New Clamp Option

    # 2. Time Info
    doc = op.GetDocument()
    if not doc: return
    fps = doc.GetFps()
    cur_frame = doc.GetTime().GetFrame(fps)

    # Global Window Size
    global_window = float(end_f - start_f)
    if global_window <= 0: global_window = 0.001

    # 3. Iterate Inputs
    count = inputs.GetCount()
    positions = inputs._position

    for i in range(count):

        # --- A. STABLE RANDOMIZATION ---
        p = positions[i]
        # We generate 3 unique noise values per object using different coefficients
        noise_val_1 = math.sin((p.x * 12.989 + p.y * 78.233 + p.z * 151.718) + seed)
        noise_val_2 = math.cos((p.x * 39.712 + p.y * 11.921 + p.z * 91.145) + seed)
        noise_val_3 = math.sin((p.x * 11.111 + p.y * 22.222 + p.z * 33.333) + seed + 100)

        rnd_1 = (noise_val_1 + 1.0) * 0.5 # 0.0 to 1.0
        rnd_2 = (noise_val_2 + 1.0) * 0.5 # 0.0 to 1.0
        rnd_3 = (noise_val_3 + 1.0) * 0.5 # 0.0 to 1.0

        # --- B. CALCULATE START TIME ---

        # 1. Percentage Variance (0% to 100% of timeline)
        pct_delay = global_window * var_t * rnd_1

        # 2. Frame Offset (Integer Variance)
        # Maps rnd_3 (0 to 1) to (-1 to 1) range, multiplied by user input.
        # e.g. Input 10 -> Result varies randomly between -10 and 10.
        frame_shift = float(rnd_frame) * ((rnd_3 - 0.5) * 2.0)

        obj_start = start_f + pct_delay + frame_shift

        # --- C. CALCULATE DURATION (CLAMPED VS FREE) ---

        if clamp_end:
            # --- MODE: BOUNDED (Old Method) ---
            # Duration is forced to fit between Object Start and Global End.
            max_duration = end_f - obj_start

            # Speed Var reduces the duration (finish earlier)
            # If max_duration is negative (start is past end), clamp to small val
            if max_duration <= 0: max_duration = 0.001

            duration_reduction = max_duration * var_s * rnd_2
            obj_duration = max_duration - duration_reduction

        else:
            # --- MODE: UNCLAMPED (New Method) ---
            # Duration is based on Global Window, but modified freely by Speed Var.
            # Speed Variance stretches or squashes the duration freely.

            base_duration = global_window

            # Map Speed Var to a multiplier.
            # rnd_2 (0 to 1) becomes (-1 to 1).
            # Result varies duration e.g., +/- 50% if SpeedVar is 0.5
            variance_mult = var_s * ((rnd_2 - 0.5) * 2.0)

            # Apply variance: (1.0 + variance)
            # e.g. 1.0 + (-0.5) = 0.5 (Half duration / Fast)
            # e.g. 1.0 + (0.5) = 1.5 (1.5x duration / Slow)
            obj_duration = base_duration * (1.0 + variance_mult)

        # Safety Check
        if obj_duration < 0.001: obj_duration = 0.001

        # --- D. NORMALIZE PROGRESS (0.0 to 1.0) ---
        progress = (cur_frame - obj_start) / obj_duration
        progress = max(0.0, min(1.0, progress))

        # --- E. CURVE ---
        if curve:
            shaped_val = curve.GetPoint(progress).y
        else:
            shaped_val = progress

        # --- F. MIN/MAX & DIRECTION ---
        if not revert:
            # Start Min -> End Max
            final_val = map_range(shaped_val, 0.0, 1.0, val_min, val_max)
        else:
            # Start Max -> End Min
            final_val = map_range(shaped_val, 0.0, 1.0, val_max, val_min)

        outputs.SetValue(i, final_val)

    return True