Creating Dynamic Auto-Resizing Text Boxes in After Effects
The Problem: Static Text Boxes Are Limiting
If you’ve worked with text in After Effects, you’ve likely encountered this common challenge: you create a beautiful text box with a background shape, but when you update the text content, your carefully positioned background shape no longer fits. This leads to a tedious cycle of manually adjusting the background shape every time the text changes.

The Solution: Auto-Resizing Text Boxes with Expressions
Using a set of expressions, we can create dynamic text boxes that automatically resize to fit their content. These boxes can also maintain their relative positioning regardless of text length, anchor point changes, or even stroke width adjustments.
In this tutorial, I’ll show you how to set up a completely dynamic text box system with these features:
- Auto-resizing to fit text content
- Adjustable padding on all sides
- Configurable anchor points for positioning
- Customizable appearance (fill, stroke, opacity)
- Proper positioning that remains consistent when modifying other properties
Setup Guide
Step 1: Create Your Layers
- Create a Text Layer with your desired text
- Create a Shape Layer with a rectangle path
- Position the shape layer below the text layer in the timeline
Step 2: Add Expression Controls
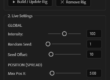
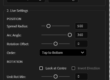
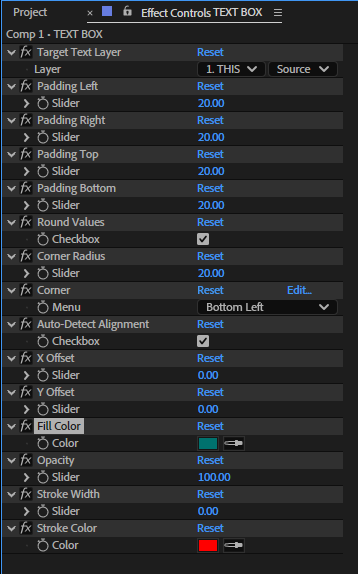
Add these Expression Controls to your Shape Layer:
- Target Text Layer (Layer Control)
- Corner (Dropdown Menu with 9 options: Top Left, Top Center, Top Right, Middle Left, Center, Middle Right, Bottom Left, Bottom Center, Bottom Right)
- Padding Left (Slider)
- Padding Right (Slider)
- Padding Top (Slider)
- Padding Bottom (Slider)
- X Offset (Slider)
- Y Offset (Slider)
- Fill Color (Color Control)
- Opacity (Slider: 0-100%)
- Stroke Width (Slider: 0-20)
- Stroke Color (Color Control)
For the Corner dropdown, set up the menu items with these values:
- Top Left
- Top Center
- Top Right
- Middle Left
- Center
- Middle Right
- Bottom Left
- Bottom Center
- Bottom Right
Step 3: Apply the Expressions
Rectangle Size Expression
Apply this expression to Rectangle Path 1 > Size:
// RECTANGLE SIZE EXPRESSION
var textLayer = effect("Target Text Layer")("Layer");
if (!textLayer) error("Select a text layer");

var r = textLayer.sourceRectAtTime(time, false);
var L = effect("Padding Left")("Slider"),
    R = effect("Padding Right")("Slider"),
    T = effect("Padding Top")("Slider"),
    B = effect("Padding Bottom")("Slider");

[r.width + L + R, r.height + T + B];
Position Expression
Apply this expression to Transform > Position:
// POSITION EXPRESSION
var textLayer = effect("Target Text Layer")("Layer");
if (!textLayer) error("Select a text layer");

// Get the text layer's source rectangle
var textRect = textLayer.sourceRectAtTime(time, false);
var textLayerPos = textLayer.transform.position.value;

// Get text layer's anchor point position in layer space
var textAnchor = textLayer.transform.anchorPoint.value;

// Get padding values
var L = effect("Padding Left")("Slider"),
    R = effect("Padding Right")("Slider"),
    T = effect("Padding Top")("Slider"),
    B = effect("Padding Bottom")("Slider");

// Get stroke width and compensate for it (strokes are centered on the path by default)
var strokeWidth = effect("Stroke Width")("Slider");
var strokeOffset = strokeWidth / 2;

// Calculate absolute position of text rectangle corners in comp space,
// adjusting for the text layer's anchor point
var textTopLeft = textLayerPos + [textRect.left - textAnchor[0], textRect.top - textAnchor[1]];

// Apply padding offsets based on which corner is the anchor point
var corner = effect("Corner")("Menu");
var result;

if (corner == 1) {
    result = textTopLeft + [-L - strokeOffset, -T - strokeOffset]; // Top Left with padding
} else if (corner == 2) {
    result = textTopLeft + [textRect.width/2, -T - strokeOffset]; // Top Center with padding
} else if (corner == 3) {
    result = textTopLeft + [textRect.width + R + strokeOffset, -T - strokeOffset]; // Top Right with padding
} else if (corner == 4) {
    result = textTopLeft + [-L - strokeOffset, textRect.height/2]; // Middle Left with padding
} else if (corner == 5) {
    result = textTopLeft + [textRect.width/2, textRect.height/2]; // Center
} else if (corner == 6) {
    result = textTopLeft + [textRect.width + R + strokeOffset, textRect.height/2]; // Middle Right with padding
} else if (corner == 7) {
    result = textTopLeft + [-L - strokeOffset, textRect.height + B + strokeOffset]; // Bottom Left with padding
} else if (corner == 8) {
    result = textTopLeft + [textRect.width/2, textRect.height + B + strokeOffset]; // Bottom Center with padding
} else if (corner == 9) {
    result = textTopLeft + [textRect.width + R + strokeOffset, textRect.height + B + strokeOffset]; // Bottom Right with padding
} else {
    result = textTopLeft + [textRect.width/2, textRect.height/2]; // Default to Center
}

// Apply manual offsets
var xOff = effect("X Offset")("Slider");
var yOff = effect("Y Offset")("Slider");

result + [xOff, yOff];
Fill Color Expression
Apply this expression to Rectangle 1 > Fill 1 > Color:
// FILL COLOR EXPRESSION
effect("Fill Color")("Color");
Fill Opacity Expression
Apply this expression to Rectangle 1 > Fill 1 > Opacity:
// FILL OPACITY EXPRESSION
effect("Opacity")("Slider");
Stroke Width Expression
Apply this expression to Rectangle 1 > Stroke 1 > Stroke Width:
// STROKE WIDTH EXPRESSION
effect("Stroke Width")("Slider");
Stroke Color Expression
Apply this expression to Rectangle 1 > Stroke 1 > Color:
// STROKE COLOR EXPRESSION
effect("Stroke Color")("Color");
Step 4: Configure Your Text Box
- Select your shape layer and use the “Target Text Layer” control to pick your text layer
- Choose the desired anchor point using the “Corner” dropdown
- Adjust padding values to create space around your text
- Set appearance properties like fill color, opacity, and stroke
How It Works
The Rectangle Size Expression
This expression obtains the dimensions of your text layer’s bounding box using sourceRectAtTime(), then adds the specified padding values to create a properly sized background.
The Position Expression
This is the most complex part of the system. It:
- Gets the text layer’s position and dimensions
- Calculates the position of each corner of the text
- Uses the “Corner” dropdown to determine which corner should be used as the anchor point
- Adjusts for padding and stroke width to maintain consistent positioning
- Applies any manual offsets
The expression ensures that when you change the anchor point (via the Corner dropdown), the text box doesn’t visually move in the composition. Similarly, when you adjust the stroke width, the position is compensated to prevent the box from shifting.
The Appearance Expressions
These simple expressions connect the shape layer’s appearance properties directly to the expression controls, allowing for easy customization.
Advanced Customization Ideas
You can extend this system with additional features:
- Corner Radius: Add a slider control and connect it to the rectangle’s rounded corners property
- Drop Shadow: Use expression-controlled layer styles
- Animation Options: Add controls for fade-ins, scale effects, etc.
- Minimum Size: Set minimum width/height regardless of text length
- Fixed Aspect Ratio: Maintain proportions regardless of text changes
Troubleshooting Tips
- Text Box Jumping: If your text box jumps when changing properties, check that your position expression is correctly accounting for stroke width and padding.
- Text Overflow: For multi-line text, you may need to adjust text layer settings like line spacing and alignment to ensure accurate sizing.
- Performance: These expressions can be calculation-intensive. If you experience slowdown, consider pre-composing or baking the animations once finalized.
Conclusion
This auto-resizing text box system saves countless hours of manual adjustments when working with text in After Effects. While the initial setup requires some time, the flexibility it provides is invaluable for projects with changing text content or multiple text boxes that need consistent styling.
Feel free to adapt these expressions to your specific needs or combine them with other techniques to create even more powerful text effects.
Pro Tip: Save your configured shape layer as an Animation Preset to quickly reuse it in future projects. Simply select the shape layer, go to Animation > Save Animation Preset, and give it a descriptive name.
Feel Free to Download Example Scene:
Download “Auto Resize Text Box” AutoResizeTextBox.zip – Downloaded 27 times – 11.68 KB