Maze Generator in Cinema 4D Using Python
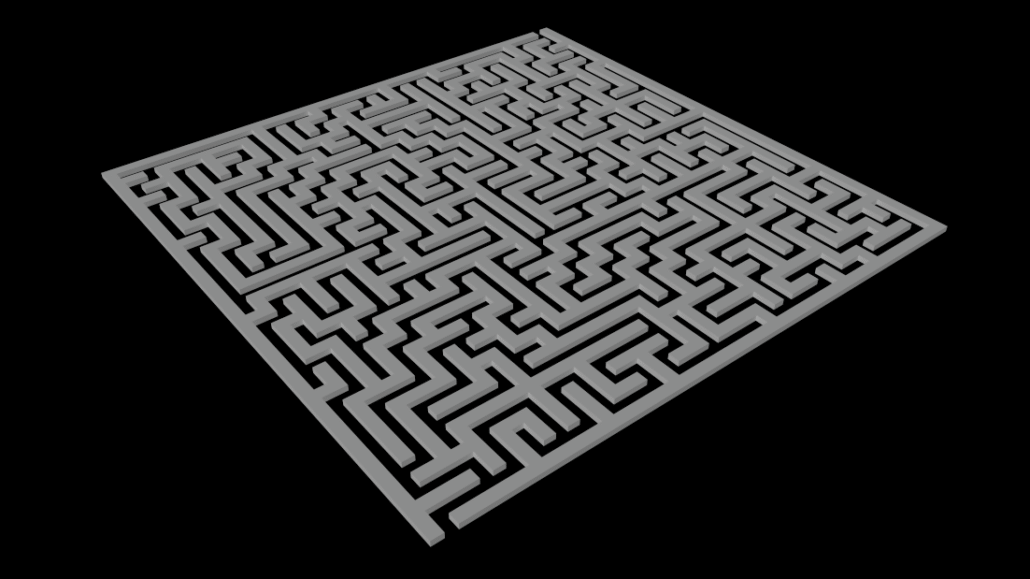
An innovative method for generating dynamic maze structures has been developed using Cinema 4D and Python. In this tutorial, we dive into the Maze Generator, which leverages the recursive backtracking algorithm to create intricate maze patterns. This generator not only demonstrates algorithmic artistry but also showcases how Python can be integrated into Cinema 4D workflows to automate scene generation.
Overview
The Maze Generator script operates by:
- Initialising a grid filled with walls.
- Employing the recursive backtracking algorithm to carve out paths by randomly selecting directions.
- Creating an entrance and exit to the maze.
- Generating 3D cube objects to represent maze walls in Cinema 4D.
This method offers a unique fusion of procedural generation techniques with 3D modelling, inspiring both technical and creative artists.
The Recursive Backtracking Algorithm
The heart of the maze generation is the recursive_backtracking function. Here’s what it does:
- Shuffle Directions:
Randomly shuffles the four possible movement directions to ensure a different maze layout with each execution. - Movement and Checking:
For each direction, it checks if the new cell lies within the grid and hasn’t been visited (i.e., it remains a wall). - Carving Paths:
If the conditions are met, it opens a path between the current cell and the neighbouring cell by clearing the wall between them. - Recursion:
The function recurses into the new cell, repeating the process until the entire maze is generated.
By ensuring that only cells with odd indices are carved out, the script guarantees a proper maze structure with clear pathways.
The Cinema 4D Python Generator Script
Below is the complete Maze Generator script. This script retrieves user-defined parameters (such as extrusion height, wall thickness, and maze dimensions), generates the maze using the algorithm, and then populates the scene with cubes to represent maze walls.
# Maze Generator by Mehmet Sensoy
import c4d
import random

def recursive_backtracking(m, x, y, width, height):
    # Directions array to hold the four possible directions
    directions = [(0, -2), (0, 2), (2, 0), (-2, 0)]
    random.shuffle(directions)  # Shuffle directions to ensure randomness

    for dx, dy in directions:
        nx, ny = x + dx, y + dy
        if 0 <= nx < width and 0 <= ny < height and m[nx][ny] == 1:
            between_x, between_y = x + dx // 2, y + dy // 2
            if m[between_x][between_y] == 1:
                # Open path between the current cell and the next cell
                m[nx][ny] = 0
                m[between_x][between_y] = 0
                recursive_backtracking(m, nx, ny, width, height)

def generate_maze(width, height, random_seed):
    random.seed(random_seed)
    # Initialize maze array with walls (1)
    m = [[1 for _ in range(height)] for _ in range(width)]
    # Start the maze from an odd indexed cell to ensure proper maze paths
    recursive_backtracking(m, 1, 1, width, height)

    # Create entrance and exit
    m[1][0] = 0  # Entrance
    m[width-2][height-1] = 0  # Exit
    return m

def main():
    # Retrieve user data
    extrusion_height = op[c4d.ID_USERDATA, 1]
    wall_thickness = op[c4d.ID_USERDATA, 2]
    maze_width = op[c4d.ID_USERDATA, 3]  # Ensure odd number
    maze_height = op[c4d.ID_USERDATA, 4]  # Ensure odd number
    random_seed = op[c4d.ID_USERDATA, 5]

    # Adjust for even dimensions
    if maze_width % 2 == 0:
        maze_width += 1
    if maze_height % 2 == 0:
        maze_height += 1

    # Generate the maze
    m = generate_maze(maze_width, maze_height, random_seed)

    # Parent null object for organizing the maze cubes
    parent = c4d.BaseObject(c4d.Onull)
    parent.SetName("Maze")

    # Create cubes for walls
    for x in range(maze_width):
        for y in range(maze_height):
            if m[x][y] == 1:
                cube = c4d.BaseObject(c4d.Ocube)
                cube[c4d.PRIM_CUBE_LEN] = c4d.Vector(wall_thickness, extrusion_height, wall_thickness)
                cube.SetRelPos(c4d.Vector(x * wall_thickness, 0, y * wall_thickness))
                cube.InsertUnder(parent)

    c4d.EventAdd()
    return parent
How to Use This Script
- Scene Setup:
- Open Cinema 4D and create a new scene.
- Add a Python Generator object to your scene.
- Replace the default Python code with the Maze Generator script provided above.
- Configuring User Data:
- In the Python Generator’s User Data Manager, add the following parameters:
- Extrusion Height: Controls the height of each maze wall.
- Wall Thickness: Specifies the size of the cubes representing the walls.
- Maze Width: The width of the maze grid (should be an odd number; the script adjusts even numbers automatically).
- Maze Height: The height of the maze grid (again, should be odd; even numbers are adjusted).
- Random Seed: A seed for the randomiser to generate different maze configurations.
- Execution:
- Once the parameters are set, execute the script.
- A null object named “Maze” will appear in your scene, containing all the wall cubes. This makes it easy to manage or animate the maze as a unified object.
Conclusion
This Maze Generator script exemplifies how computational algorithms can integrate with 3D modelling to create complex, dynamic structures in Cinema 4D. By merging Python programming and Cinema 4D’s robust object system, artists and technical directors can quickly generate unique maze designs for modular sets, procedural environments, or creative visual effects.
Experiment with different parameters and random seeds to explore the endless possibilities of your maze designs. Happy modelling!