Step 1: Create a New Shape Layer
Open your After Effects composition.
Create a new Shape Layer by navigating to:
Layer > New > Shape Layer.
Step 2: Add a Path to the Shape Layer
With your Shape Layer selected, click the “Add” button (next to Contents in the Timeline) and choose “Path”.
This adds a default path to your shape layer. You will later apply your expression code to this path.
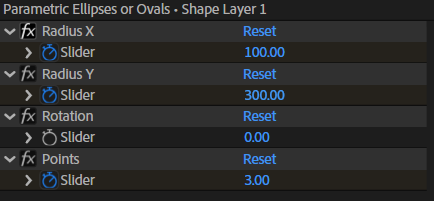
Step 3: Add Slider Controls
You’ll need several Slider Controls to adjust your ellipse. With the Shape Layer (or an external Null if you prefer controlling multiple layers) selected, add the following effects:
- “Radius X” (for the ellipse’s horizontal radius)
- “Radius Y” (for the ellipse’s vertical radius)
- “Rotation” (to rotate the ellipse in degrees)
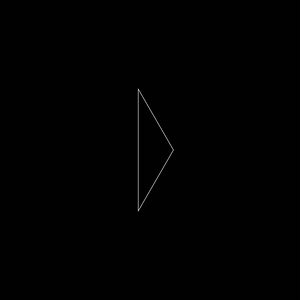
- “Points” (to define the number of vertices that will form the ellipse, which controls its smoothness)
To add a slider:
Go to the menu:
Effect > Expression Controls > Slider Control.
Rename each slider control to match the names above by selecting the effect and renaming it in the Effect Controls panel.
Step 4: Apply the Expression Code
In the Timeline, twirl open your Shape Layer’s Contents, then the “Path” property.
Alt-click (Option-click on Mac) the stopwatch icon next to Path to activate the expression editor.
Delete any default text in the expression box and paste the code provided below:
// Expression for a shape layer's Path property to create a parametric ellipse
// Slider Controls: "Radius X", "Radius Y", "Rotation", and "Points"

var radiusX = effect("Radius X")("Slider");
var radiusY = effect("Radius Y")("Slider");
var rotation = effect("Rotation")("Slider");

var numPoints = Math.max(effect("Points")("Slider"), 3); // Ensure at least 3 points for a valid ellipse

var vertices = [];
var inTangents = [];
var outTangents = [];
var twoPi = Math.PI * 2;

for (var i = 0; i < numPoints; i++){
    var theta = twoPi * i / numPoints + degreesToRadians(rotation);
    var x = radiusX * Math.cos(theta);
    var y = radiusY * Math.sin(theta);
    vertices.push([x, y]);
    inTangents.push([0, 0]);
    outTangents.push([0, 0]);
}

createPath(vertices, inTangents, outTangents, true);Step 5: Customize and Preview
- Adjust each slider control in the Effect Controls panel:
- “Radius X” determines the horizontal spread of the ellipse.
- “Radius Y” sets the vertical spread.
- “Rotation” will rotate the ellipse.
- “Points” adjusts how many vertices form the ellipse (more points create a smoother ellipse).
- Preview the layer in your Composition panel. You will see the parametric ellipse update dynamically as you change the slider values.
Step 6: Animate (Optional)
If you wish, you can animate any of the slider controls over time by setting keyframes. This allows you to transform your ellipse dynamically (for example, morphing from a circle to an elongated oval, or rotating it over time).
Summary
In this tutorial you learned how to generate a parametric ellipse by:
• Adding a shape layer and path
• Using slider controls to define parameters like Radius X, Radius Y, Rotation, and number of Points
• Writing an expression that calculates the ellipse’s vertices using sine and cosine functions
• Applying the expression and previewing the dynamically generated ellipse
Enjoy creating and customizing your parametric shapes in After Effects with this powerful technique!
You can download the project file by clicking link below: